Fixing Core Data Concurrency Violations
With iOS 8.0 Apple gave us access to a tool for tracking down code that violates Core Data concurrency rules. This post outlines how to setup Xcode so that you can identify and fix the faulty code.
Background #
According to the Core Data concurrency rule, each thread must have its own managed object context. This is because NSManagedObjectContext and NSManagedObject, two most fundamental objects in Core Data, are not thread safe. They shouldn’t be initialized in one thread and accessed from a different thread.
Multi-Context Core Data Stack #
Let’s explore this concept of thread confinement further through a specific example. I have created a sample app to demonstrate how to track and fix these violations. Go ahead and clone the repo from Github or browse the code online to follow along. Figure below shows the Core Data stack for the sample app.

This setup is inspired by a wonderful blog post on the subject by @Cocoanetics.
In this setup, all background queues are given a brand new private queue context. These contexts are created with the concurrency type NSPrivateQueueConcurrencyType. They are temporary and will get destroyed once the background queue is done performing a task. The overhead for creating a new instance of a private queue context is very low. Therefore, we can create as many of them as we need.
The main queue context is a special context that should only be accessed from the main (UI) queue. It is created with the concurrency type NSMainQueueConcurrencyType. It acts as a parent for all temporary private queue contexts.
Finally, the master context which also has the concurrency type NSPrivateQueueConcurrencyType acts as a parent for the main queue context itself. The master context is the only one that has access to the persistent store coordinator which is responsible for saving or reading data from an underlying SQLite database.
If any of this sounds confusing, I highly recommend reading the Multi-Context Core Data blog post or watching the Core Data Best Practices video from WWDC 2012.
Here is how the stack looks like in code:
class CoreDataStack {
  func newPrivateQueueContext() -> NSManagedObjectContext? {
    let parentContext = self.mainQueueContext

    if parentContext == nil {
      return nil
    }

    var privateQueueContext =
      NSManagedObjectContext(concurrencyType:
        .PrivateQueueConcurrencyType)
    privateQueueContext.parentContext = parentContext
    privateQueueContext.mergePolicy =
      NSMergeByPropertyObjectTrumpMergePolicy
    return privateQueueContext
  }

  lazy var mainQueueContext: NSManagedObjectContext? = {
    let parentContext = self.masterContext

    if parentContext == nil {
      return nil
    }

    var mainQueueContext =
      NSManagedObjectContext(concurrencyType:
        .MainQueueConcurrencyType)
    mainQueueContext.parentContext = parentContext
    mainQueueContext.mergePolicy =
      NSMergeByPropertyObjectTrumpMergePolicy
    return mainQueueContext
  }()

  private lazy var masterContext: NSManagedObjectContext? = {
    let coordinator = self.persistentStoreCoordinator

    if coordinator == nil {
      return nil
    }

    var masterContext =
      NSManagedObjectContext(concurrencyType:
        .PrivateQueueConcurrencyType)
    masterContext.persistentStoreCoordinator = coordinator
    masterContext.mergePolicy =
      NSMergeByPropertyObjectTrumpMergePolicy
    return masterContext
  }()

  // ...
}
When a temporary private queue context wants to save data, it will have to ask its parent (i.e., the main queue context) to do that for it. The main queue context in turn asks its parent (i.e., the master context) to do the same. To make this recursive save easier, I have extended the NSManagedObjectContext class as shown below.
extension NSManagedObjectContext {
  func saveRecursively() {
    performBlockAndWait {
      if self.hasChanges {
        self.saveThisAndParentContexts()
      }
    }
  }

  func saveThisAndParentContexts() {
    var error: NSError? = nil
    let successfullySaved = save(&error)

    if successfullySaved {
      parentContext?.saveRecursively()
    } else {
      println("Error: \(error!.localizedDescription)")
    }
  }
}
Common Core Data Concurrency Violations #
Listed below are two common scenarios where these violations are most likely to occur.
Scenario 1 #
Imagine that we need to access some data stored in a database from the main queue. Since we are in the main queue, we will use the main queue context to query that data. Core Data will give us an instance of NSManagedObject through which we can query the data we need. Let’s say we want to do some expensive operation with the data we just retrieved. Not wanting to block the main queue, we decided to perform this operation on a background queue. Here comes the important part. Because NSManagedObject is not thread-safe, we cannot simply pass a reference to the managed object we received from Core Data to the background queue. Instead, we will have to pass the managed object’s objectID which is thread-safe. Now the background queue can use a private queue context to request its own instance of NSManagedObject using the objectID. This instance will point to the same underlying data as the original NSManagedObject instance created for the main queue context.
Scenario 2 #
For this scenario, let’s say we need to access some data from a background queue. Since we are in a background queue, we should be using a private queue context. However, it is very easy to forget that and simply use the main queue context to query the data we need. This will certainly lead to a violation of the concurrency rules.
Now that we have understood what it means to violate the Core Data concurrency rules, let’s move onto tracking those violations.
Tracking Violations #
Listed below are step-by-step instructions for tracking Core Data concurrency violations.
Step 1: Enable Core Data multi-threading assertions by passing following arguments during app launch.
-com.apple.CoreData.ConcurrencyDebug 1
Xcode lets us specify which arguments to pass during the app launch from the scheme editor as shown in figures below.


Step 2: Verify that Xcode prints out following text in console to indicate that the multi-threading assertions is enabled. You can use the keyboard shortcut ⌘⇧Y to bring up the console.
CoreData: annotation: Core Data multi-threading assertions enabled.
Note: Once the Core Data debugging is enabled, Xcode will throw an exception whenenver the app attempts to access an instance of managed object from a wrong context. You might want to check this change into your version control system so that everyone in your team can benefit from tracking these violations early during development.
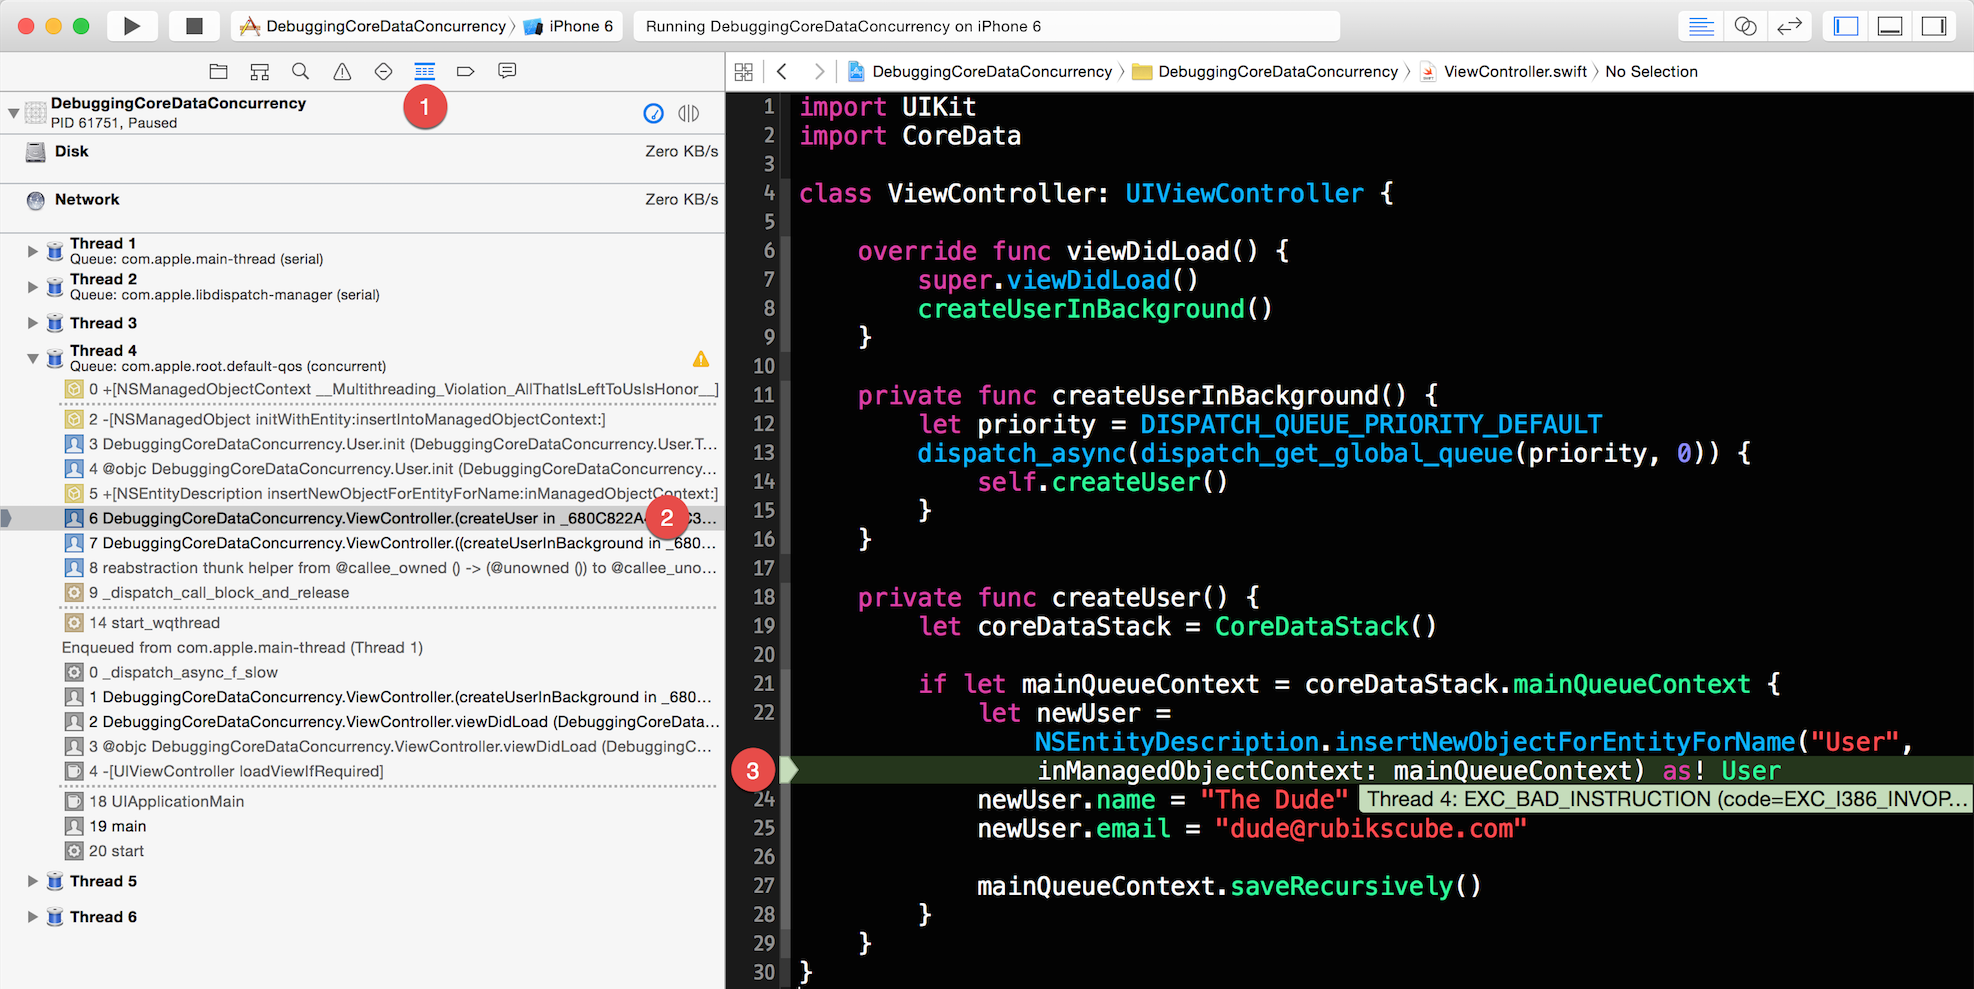
Step 3: Locate code that violates the concurrency rule. Go through the use case that exercises the code you suspect is violating the concurrency rule. If your suspicion is true, Xcode will throw an exception.
When an exception is thrown, Xcode might take you directly to the offending code. But if that is not the case, use the keyboard shortcut ⌘6 to reveal the debug navigator. Now dig into the call stack for each thread until you have tracked down the offending code. Figure below shows an example call stack leading us to the code that is violating the concurrency rule.
Fixing Violations #
Step 1: We will use the example code listed above to demonstrate how to fix a violation. As you can see the createUser method is being called from a background queue like this:
private func createUserInBackground() {
  let priority = DISPATCH_QUEUE_PRIORITY_DEFAULT
  dispatch_async(dispatch_get_global_queue(priority, 0)) {
    self.createUser()
  }
}
Therefore, we need to use a private queue context instead of the main queue context to save the user data like this:
private func createUser() {
  let coreDataStack = CoreDataStack()

  if let newPrivateQueueContext =
    coreDataStack.newPrivateQueueContext()
  {
    newPrivateQueueContext.performBlock {
      let newUser =
        NSEntityDescription
          .insertNewObjectForEntityForName("User",
            inManagedObjectContext: newPrivateQueueContext)
              as! User

      newUser.name = "The Dude"
      newUser.email = "dude@rubikscube.com"

      newPrivateQueueContext.saveRecursively()
    }
  }
}
Important: All operations that need to be performed in a thread-safe manner must be pushed inside either the performBlock or performBlockAndWait. This will ensure that the operations are executed on the right queue specified for the context.
Step 2: Run the app (⌘R) and verify that Xcode doesn’t throw an exception anymore.
Conclusion #
Needless to say, it is important to not violate any concurrency rule whether that is related to Core Data or something else. Apple has made the task of tracking down Core Data related concurrency issues easier by providing a debugging tool. I recommend always running this tool to verify that no code is violating the concurrency rules.
Full code for the sample app is available on Github.
Further Reading #
- Multi-Context Core Data
- Core Data Best Practices: WWDC 2012
- WWDC 2014 session 225 (What’s New in Core Data)