How to Debug Significant Location Change in iOS
If an app has registered to listen for significant location change notifications, but is subsequently terminated, iOS will automatically relaunch the app into the background, if a new notification arrives. iOS generates significant location change notifications as soon as the device moves 500 meters or more from its previous notification location. These notifications don’t arrive more frequently than once every five minutes. Therefore, it could be challenging to test or debug code that handles these notifications without driving around with your device.
This article outlines steps you can follow in order to debug (or test)
significant location change notifications using iOS
simulator and Xcode. We will use the SignificantlyChanged app as an example here, but you should be able to use the instructions listed here with any other app. SignificantlyChanged is a test app written specifically for this blog post. All it does is ask for user’s permission to use current location as soon as the app is launched. When the app goes to background, it registers for significant location change notifications. Finally, when the app is about to
enter foreground, it stops listening to those notifications.
Step 1: Open iPhone simulator (Xcode > Open Developer Tool > iOS Simulator).
Step 2: Reset simulator (iOS Simulator > Reset Contents and Settings…).
Step 3: Install SignificantlyChanged app on simulator. Allow the app to use your current location when asked.
Step 4: Click stop from Xcode (or use shortcut ⌘.) to terminate SignificantlyChanged.
Step 5: Make sure location simulation is turned off (select Debug > Location > None from iOS Simulator).
Step 6: Launch app by tapping the app icon from iOS simulator
Step 7: Send app to the background (⌘⇧H). This will cause the app to register for significant location change notifications.
Step 8: Terminate the app
- Use ⌘⇧HH key combination to launch the multitasking cards interface
- Click and hold the card for your app and then toss it up and away
- Use ⌘⇧H key combination to go back to the home screen
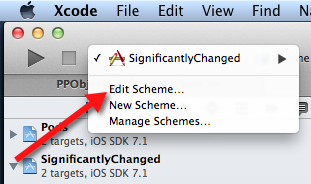
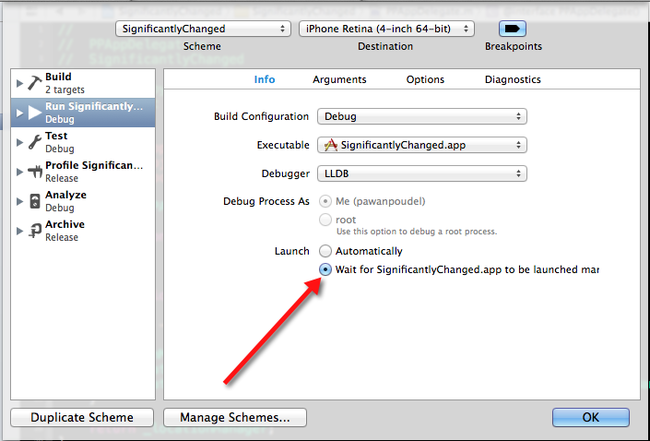
Step 9: Edit SignificantlyChanged app’s scheme so that Xcode waits for the app to be launched manually.
Step 10: Set a breakpoint either inside the application:didFinishLaunchingWithOptions: method in app delegate or any other method that handles UIApplicationDidFinishLaunchingNotification.
Step 11: Click run from Xcode (or use shortcut ⌘R) to run SignificantlyChanged on simulator. You should see Waiting for SignificantlyChanged to Launch spinner.
Step 12: Put location simulation mode to freeway (select Debug > Location > Freeway Drive from iOS simulator)
- The freeway mode provides location simulation with enough speed for the simulator to generate significant location change notifications consistently.
Step 13: Wait for a notification to arrive. It should arrive within 5 minutes. Once a notification arrives, your breakpoint (if you’ve set one) should be hit as shown in figure below.


